
성장 아카이브
iOS 14 WidgetKit 적용하기 본문
완성본
먼저-! 결과물은 아래와 같습니다.

위젯 사이즈 small, medium, large 중 small만 채택하여 현재 달성한 체크리스트 현황을 보여주는 위젯을 구현해보려고 합니다.
과정
기본구성 살펴보기
시작하기
위젯에는 3가지 중요한 컴포넌트가 있습니다.
-
A Configuration that determines whether the widget is configurable, identifies the widget, and defines the SwiftUI views that show the widget’s content. -> 위젯 타입
-
A Timeline Provider that drives the process of updating the widget’s view over time. -> 위젯 업데이트 타이밍 정보
-
SwiftUI Views used by WidgetKit to display the widget. -> 위젯의 뷰를 구성하는 SwiftUI
* 위젯타입 / 업데이트 타이밍 정보 / 위젯의 뷰를 구성하는 SwiftUI
우선 Widget의 Configuration으로는 크게 2가지가 있습니다.
StaticConfiguration : 기본적으로 정보를 노출시켜주는 위젯
IntentConfiguration : 사용자가 커스텀 및 사용자와 상호작용 할 수 있는 위젯
이 중 저는 기본적인 정보만 노출시켜줄 것이기 때문에 StaticConfiguration을 설정해줬습니다.
설정 방법은 프로젝트 내 Extension 추가해줄 때 "Include Configuration Intent"를 언체크해주면 됩니다.
소스 살펴보기
이제 소스를 살펴보겠습니다.

import WidgetKit
import SwiftUI

struct Provider: TimelineProvider {
    func placeholder(in context: Context) -> SimpleEntry {
        SimpleEntry(date: Date())
    }

    func getSnapshot(in context: Context, completion: @escaping (SimpleEntry) -> ()) {
        let entry = SimpleEntry(date: Date())
        completion(entry)
    }

    func getTimeline(in context: Context, completion: @escaping (Timeline<Entry>) -> ()) {
        var entries: [SimpleEntry] = []

        // Generate a timeline consisting of five entries an hour apart, starting from the current date.
        let currentDate = Date()
        for hourOffset in 0 ..< 5 {
            let entryDate = Calendar.current.date(byAdding: .hour, value: hourOffset, to: currentDate)!
            let entry = SimpleEntry(date: entryDate)
            entries.append(entry)
        }

        let timeline = Timeline(entries: entries, policy: .atEnd)
        completion(timeline)
    }
}

struct SimpleEntry: TimelineEntry {
    let date: Date
}

struct RookieWidgetEntryView : View {
    var entry: Provider.Entry

    var body: some View {
        Text(entry.date, style: .time)
    }
}

@main
struct RookieWidget: Widget {
    let kind: String = "RookieWidget"

    var body: some WidgetConfiguration {
        StaticConfiguration(kind: kind, provider: Provider()) { entry in
            RookieWidgetEntryView(entry: entry)
        }
        .configurationDisplayName("My Widget")
        .description("This is an example widget.")
    }
}

struct RookieWidget_Previews: PreviewProvider {
    static var previews: some View {
        RookieWidgetEntryView(entry: SimpleEntry(date: Date()))
            .previewContext(WidgetPreviewContext(family: .systemSmall))
    }
}
맨 위에서부터 순서대로 살펴보겠습니다.
- TimelineProvider
중요한 3 컴포넌트 중 위젯을 새로고침 및 업데이트 하는 타이밍을 정의하는 부분입니다.
* func getTimeline(...)
getTimeline은 위젯의 업데이트 타이밍을 변경해줄 때 수정돼야 하는 중요한 함수입니다.
- TimelineEntry (SimpleEntry)
업데이트 타이밍 정보(date)를 가지고 있습니다.
- View (RookieWidgetEntryView)
실제 렌더링될 위젯의 SwiftUI view를 담고 있습니다.
처음 Widget Extension을 추가하여 실행시키면 위의 결과를 볼 수 있습니다.
@main
struct RookieWidget: Widget {
    let kind: String = "RookieWidget"

    var body: some WidgetConfiguration {
        StaticConfiguration(kind: kind, provider: Provider()) { entry in
            RookieWidgetEntryView(entry: entry)
        }
        .configurationDisplayName("My Widget")
        .description("This is an example widget.")
    }
}

struct RookieWidget_Previews: PreviewProvider {
    static var previews: some View {
        RookieWidgetEntryView(entry: SimpleEntry(date: Date()))
            .previewContext(WidgetPreviewContext(family: .systemSmall))
    }
}
위의 코드를 정리해보면,
StaticConfiguration을 사용하고 있고
RookieWidgetEntryView의 SwiftUI로 만든 View를 사용하고 있습니다.
또한 그림2 처럼 name은 "My Widget"으로, description은 "This is an example widget."으로 노출될 것입니다.
Preview는 SwiftUI preview(미리보기) 영역을 설정해주는 부분입니다.
직접 커스텀해보기
이제 직접 위젯을 커스텀해보겠습니다.
커스텀할 내용은 3가지입니다.
1. TimelineEntry는 사용하지 않음 (WidgetCenter를 사용해서 업데이트 타이밍 직접 호출 예정)
2. View는 따로 정의
3. App에서 데이터를 공유하여 Widget Extesion에서 사용
파일 추가하기
추가적으로 TimelineEntry를 별도의 파일 RookieEntry로 만들었습니다. -> swift파일
또 위젯뷰를 커스텀할 SwiftUI파일인 RookieEntryView를 생성해주었습니다. -> swiftUI파일

* 이 두 파일은 아래와 같이 Target Membership으로 Widget Extension을 바라보게 변경해주세요.

TimelineEntry와 View 파일 커스텀하기
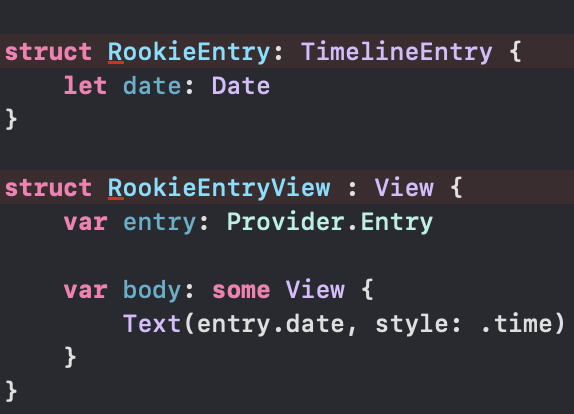
RookieEntry(TimelineEntry)에는 기본적으로 date만 선언해줍니다.

RookieEntryView(View)에는
RookieEntry 변수를 하나 선언해주고,
let entry: RookieEntry"Rookie 위젯-! 환영합니다:)" 문구를 노출시키도록 해보겠습니다.

자 이제 RookieWidget.swift로 돌아가서
SimpleEntry은 RookieEntry로, RookieWidgetEntryView은 RookieEntryView로 바꿔보도록 하겠습니다.
[빠르게 변경하는 법]
SimpleEntry 단어를 더블 클릭한 뒤, Editor > Edit All in Scope 를 선택하여 RookieEntry로 바꿔주세요.
* 같은 방법으로 RookieWidgetEntryView를 RookieEntryView로 대체해주세요.
그리고 RookieWidget.swift에 정의되어 있는 TimelineEntry와 View struct를 삭제해주세요.
다음으로 Provider 내에 전역으로 사용할 entry 변수를 하나 선언해줍니다.
let rookieEntry = RookieEntry(date: Date())그리고 RookieEntry가 선언되는 부분은 해당 변수로 대체합니다.

* 수정 중에 발생하는 에러는 무시해주세요.
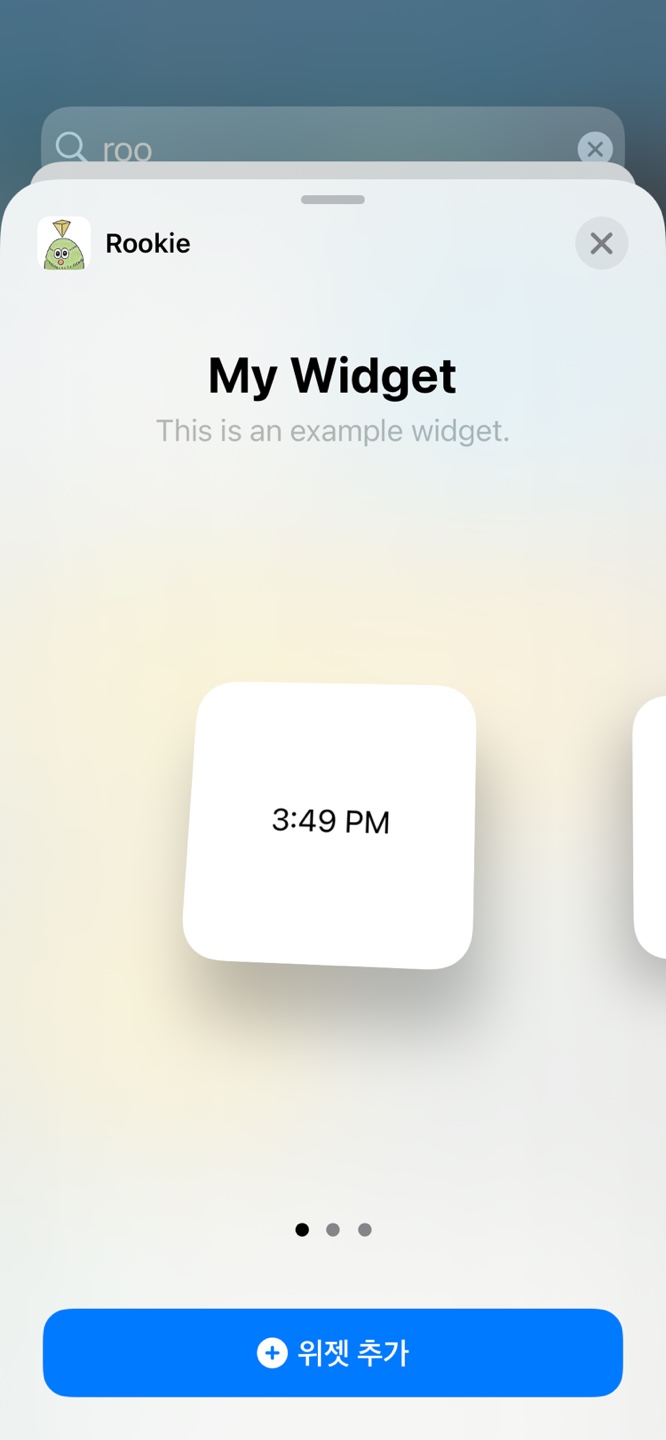
그리고 위젯 추가하는 윈도우에서 보여질 name과 description도 아래와 같이 변경해보겠습니다.

이제 커스텀한 View를 실행시켜도록 하겠습니다. 실행해보면 다음과 같은 결과물이 나옵니다.

앱과 Extension 데이터 공유
다음으로 App Container와 Extension Container 간에 UserDefaults 데이터를 공유하도록 해보겠습니다.
프로젝트 > Signing & Capabilities로 가서 TARGETS 중 프로젝트와 Extension에 각각 + Capability 버튼을 눌러 App Groups를 추가해줍니다.
* App Groups의 ID는 주로 'group.번들아이디' 로 많이 사용합니다. 프로젝트에서 추가해주면 자동으로 Developer에 추가됩니다.
자 이제 App 내 소스로 가서 Extension과 공유할 UserDefault를 정의해보겠습니다.

기존 standard가 아닌 suiteName으로 선언해주어야 합니다.
UserDefaults(suiteName: "group.번들아이디")그리고 위젯 View인 RookieEntryView SwiftUI파일로 가서 해당 값을 가져와 Text로 노출시켜줍니다.
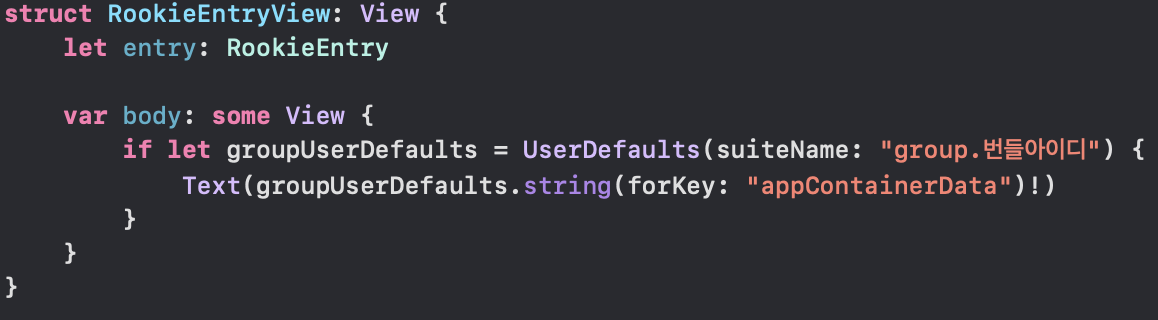
네 그럼 아래와 같이 App Container에서 저장한 데이터를 Extension에서도 사용할 수 있게 됩니다.

그럼 이제 필요한 개념은 모두 설명되었습니다.
맨 위의 위젯처럼 더욱 커스텀하게 구현하기 위해서는 추가적으로 2가지만 하면 됩니다.
1. App Container에서 필요한 정보인 'Image 파일명'과 '오늘의 달성률 수치' 가져오기
2. SwiftUI를 활용해 Image와 Text 구현하기
이 부분은 각자의 프로젝트에 맞게 커스텀하면 되는 부분입니다:) 좀 더 알찬 구성과 깔끔한 위젯 UI를 위해 추가적으로 SwiftUI를 더 공부해봐야겠습니다-!
- 마침 -
'Rookie' 카테고리의 다른 글
| Rookie 개인정보처리방침 (0) | 2020.10.13 |
|---|